Cryogenic treatment for D2 and M2: what it changes and what it does not
Few topics in tool steel generate stronger claims than cryogenic treatment. Some tool makers swear by it and report tool life doubled. Heat treaters with long experience often say it makes no difference when the base heat treatment is done properly. The truth sits in between, and buyers need to know which part of the story is solid.
This note explains what the treatment does inside the steel, where it fits in the cycle and how to write it on a drawing without paying for a miracle.
What the treatment is
Cryogenic treatment cools a hardened steel part to very low temperature, then returns it slowly to room temperature. Two levels are in use:
- Sub-zero treatment reaches about -70 to -80 °C, typically with a refrigerated chamber or dry ice. It is cheap and well established in the heat treat industry.
- Deep cryogenic treatment reaches about -185 °C or lower, using liquid nitrogen vapour. The part is held at temperature for many hours, commonly 12 to 36, and brought back up to room temperature slowly.
The cooling and warming rates are slow on purpose, often a few degrees per minute, to avoid thermal shock. A part dropped straight into liquid nitrogen can crack.
What it reliably does: retained austenite
When a high carbon, high chromium steel such as D2 is hardened, not all the austenite turns to martensite on quenching. A portion stays as retained austenite. In D2 hardened from a high austenitising temperature this can reach 15 to 30 percent by volume, and in M2 it is typically lower but still present.
Retained austenite is softer than martensite and it is unstable. Over time, or under load, it can transform and cause dimensional growth in a finished part. Cooling the steel further drives more of it to martensite. This is the well accepted effect and the one with the clearest physical basis:
- Hardness rises a little, usually 1 to 2 HRC.
- Dimensional stability improves, which matters for gauges and precision tooling.
- The risk of later transformation under grinding or in service falls.
Standard multiple tempering cycles do much of the same work. Two or three tempers at the right temperature convert most of the retained austenite, so a sub-zero step is an addition, not a replacement.
What is disputed: the wear claims
Deep cryogenic treatment is also reported to produce fine carbide precipitates, sometimes called eta carbides, that increase wear resistance beyond the effect of retained austenite conversion. Published studies report tool life gains on D2 and M2 ranging from small to well over 100 percent, and other studies report no benefit at all.
The spread is wide because the results depend on the starting heat treatment, the temper cycle that follows, the soak time and the application. A tool that was poorly heat treated to begin with will show a large gain, and a tool that was heat treated correctly may show none.
A fair reading for a buyer is this: the treatment is low risk when done properly and may help, but a specified tool life gain cannot be promised and should not be assumed in a quote.
Where it sits in the cycle
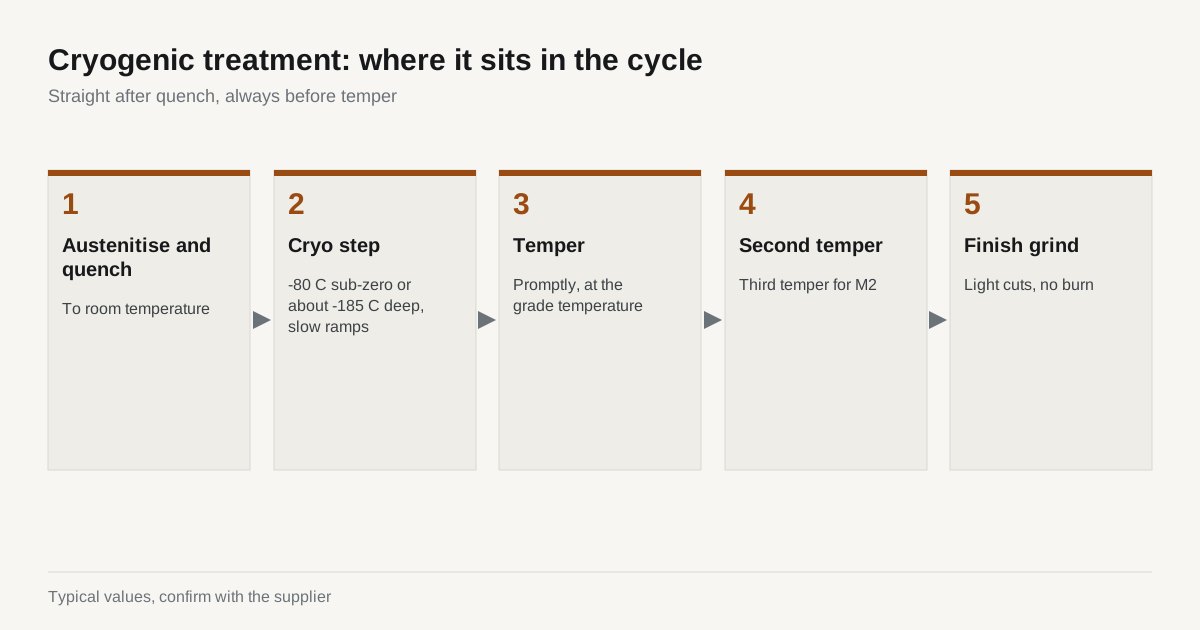
Sequence is where jobs go wrong. The standard route is:
- Austenitise and quench to room temperature.
- Cryogenic treatment, promptly after the quench.
- Temper, at the usual temperature for the grade.
- A second temper, and for M2 often a third.
The part goes straight from quench to cryo without long delay, because retained austenite can stabilise with time at room temperature and then resist transformation. The temper after cryo is not optional. Freshly formed martensite is very brittle, and an untempered part can crack in handling or in the first hours of service.
| Step | D2 typical | M2 typical |
|---|---|---|
| Austenitise | 1020 to 1040 °C | 1190 to 1230 °C |
| Quench | Air or vacuum gas | Oil, salt or vacuum gas |
| Cryo | -80 °C or deep, after quench | -80 °C or deep, after quench |
| Temper | 200 to 540 °C depending on goal | About 540 to 560 °C, two or three times |
| Final hardness | 58 to 62 HRC | 62 to 65 HRC |
These are typical ranges only. The treater follows the steel producer data sheet for the exact grade.
Cost, lead time and risk
Deep cryogenic treatment adds a day or more of chamber time. Sub-zero treatment adds a few hours. The cost is a modest part of the heat treat bill on small parts, but it is not free and it adds days to lead time when the batch has to wait for a chamber slot.
The risk is cracking in large or complex sections with sharp internal corners, where thermal gradients are steep. Mitigation is the same as in any heat treatment: slow cooling and warming, sections as uniform as the design allows and immediate tempering. If a part has a history of cracking in the quench, do not add a cryogenic step without discussing it with the heat treater.
Where it makes the most sense
The practical cases for cryogenic treatment:
- Gauges, masters and precision fixtures where dimensional stability over years matters more than wear. Our note on hardened gauges and fixtures covers that use.
- High carbon, high chromium cold work tools like D2, where retained austenite is highest after a high-temperature austenitise.
- High speed steel cutting tools such as M2 and M42 where some users see a consistent wear gain on their own applications.
- Wear parts in repeat production where a trial on one batch can be measured against an untreated batch.
It makes less sense on pre-hardened steels, on low alloy steels or on parts where the failure mode is chipping rather than wear.
How to test whether it helps your application
The most useful answer for a buyer is a controlled trial. Take one batch of parts from the same heat of steel, the same furnace load and the same tempering cycle. Treat half with the cryogenic step and leave half as the baseline. Measure what matters in your own process, such as parts produced before the edge needs regrinding, dimensional drift over six months or the number of rejected parts for wear. Record the hardness of both groups before the trial starts so a difference in hardness does not get mistaken for a cryogenic effect.
A trial of this kind costs little, because the treated parts are the same parts you were going to buy. It replaces opinion with a figure, and it gives you a reason to keep the step or drop it. Many tool rooms that run these trials end up applying the treatment only to the tool types where their own data shows a gain.
Common misunderstandings
Three claims come up repeatedly and are worth treating with care:
- “Cryogenic treatment replaces tempering.” It does not. A part must still be tempered afterwards, and a two-temper or three-temper cycle remains the base process.
- “It works on every steel.” The effect is documented mainly on high carbon, high alloy tool steels. Low alloy steels such as 4140 and pre-hardened mold steels gain little because they have little retained austenite to convert.
- “It is permanent and cannot be undone.” A later tempering or high temperature exposure above the original tempering temperature changes the structure again. A part that is nitrided or coated at a high temperature after cryogenic treatment should be checked.
What to write on the drawing
- The treatment type: sub-zero or deep cryo, and the minimum hold time
- The sequence: after quench, before temper
- The final hardness range and method
- Whether a stress relief is required before cryo for thin or complex parts
- A retained austenite limit only if you have a reason and a method (X-ray diffraction) to check it
Do not write a tool life target into the specification. Run a controlled trial instead, with treated and untreated parts of the same batch, and measure the result in your own process. The page on tool steel grades gives the usual hardness windows for D2 and M2 so the range on your drawing is realistic.
Checklist before you send the RFQ
- Grade and final hardness range.
- Cryogenic level: sub-zero or deep, and the reason.
- Whether the whole batch or a sample is treated.
- Any test requirement, such as hardness before and after.
- Part geometry notes: sharp corners, thin sections and weight.
Send the drawing through the RFQ form and a written quote comes back within 24 business hours.